Motivation
My main motivation for self-hosting was to move away completely from closed-source services and have control over my own data. I wanted to own the services I rely on.
Another important goal was efficiency. Since the server was built from existing desktop hardware, I wanted to keep the power consumption as low as reasonably possible while still making the system useful and reliable.
For a long time, I liked the idea of running a home server, but I did not have a strong enough practical reason to maintain one. Over time, that changed as centralized storage, shared calendars, photo and film storage, file synchronization, recipe management, and VPN access became genuinely useful.
Now that I live alone, the setup makes even more sense. I have full control over the hardware, network, and physical placement of the server, making it easier to run and maintain as part of my everyday infrastructure.
Hardware
Originally I used this PC for gaming many years and since I stopped gaming it served no use just sitting there.
Initially I thought through the goal of my server, what services I would like to use, approximately how many and how much resource they would need. Also thought about the raw storage for photos, music and movies/series. Based on my calculations and assumptions I decided to not buy any part, and use the existing configuration and make it as low on idle power consumption as possible.
The hardware to work with was the following:
- Approx APP500PS PSU
- MSI BAZOOKA B250M motherboard
- M-ATX Form Factor
- Main memory:
- 4 x Dual Channel DDR4 memory slots, support up to 64GB - 2400 MHz
- Slots
- 1 x PCIe 3.0 x16 slot (supports x16 mode)
- 2 x PCIe 3.0 x1 slots
- Storage
- 6 x SATA 6Gb/s ports
- 1 x M.2 slot (Key M)*
- LAN
- Realtek® 8111H Gigabit LAN controller
- 10/100/1000Mbps LAN
- 16 GB DDR4-2133 MHz
- Intel i3-6100 (4) @ 3.700GHz
- Intel® HD Graphics 530 Integrated GPU
- Nvidia GeForce GTX 950
- Toshiba 3.5 1TB 7200rpm 32MB SATA3 (DT01ACA100)
- Samsung 980 500GB NVMe M.2. SSD
- Optical disk drive
- StarTech.com PCIe Firewire card PEX1394A2V2
Initial removal of unneeded parts
Since I did not plan to use AI related programs, video editing etc, it was obvious to remove the GPU as it consumes the most power. Also disconnected the Optical disk drive. Very rarely I did use it working with retro software and hardware, however idling X amount watts away is not optimal, if I need to use it I will just connect it for that time.
Power management
Power management was the most important part of the home server setup, because the machine will be running continuously. Since the server was built from an old desktop PC, reducing idle power consumption was more important than maximizing performance.
The goal was not to make the system enter efficient idle states when it is not doing anything useful.
Achieving low package C-states
Modern CPUs support different idle states, commonly called C-states. These states allow the processor to reduce power usage when there is little or no work to do. The deeper the C-state, the more parts of the CPU and surrounding platform can be powered down.
There is an important difference between core C-states and package C-states. A single CPU core can be idle, but the whole CPU package can only enter deeper idle states if the rest of the system allows it. This means that even if the CPU itself supports low-power operation, other components such as PCIe devices, SATA controllers, USB devices, network cards, expansion cards, or firmware settings can prevent the system from reaching lower power states.
This optimization can be approached on two levels:
- Software configuration
- Hardware and firmware behavior
For the software side, booting a live Ubuntu system is a useful first step. A clean live system makes it easier to check whether the CPU can reach low package C-states without interference from the installed operating system, Docker containers, background services, or custom configuration. Tools such as powertop can be used to observe which idle states are being reached.
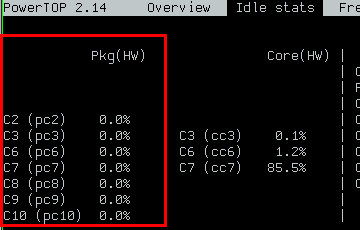
If the system can reach low package C-states in the live environment, then the issue is probably caused by the installed OS, services, drivers, or configuration. If it still cannot reach deeper idle states, then the hardware and firmware is most likely the issue.
In my case, this became a longer debugging process than expected. I first configured the BIOS power management settings and removed or disabled anything that was not necessary for the server. The goal was to reduce the system to only the components required for operation. Turning of features one by one which I did not need.
After testing, I found that the integrated network card was preventing the system from reaching deeper idle states. To hack my way around this, I disabled the integrated network card and replaced it with a 1 Gbit/s USB-to-Ethernet adapter.
The FireWire expansion card also caused problems, so it was removed as well.
One important feature in this area is Active State Power Management (ASPM). ASPM allows PCIe devices and PCIe links to reduce power usage when they are idle. On budget desktop hardware, this is not always implemented well (I had an additional 1 TB HDD (2TB in total), but this one did not support ASPM). Even if the CPU supports deep idle states, poor firmware support or badly behaving PCIe devices can keep parts of the platform active, preventing the CPU package from entering lower C-states.
Measuring power consumption
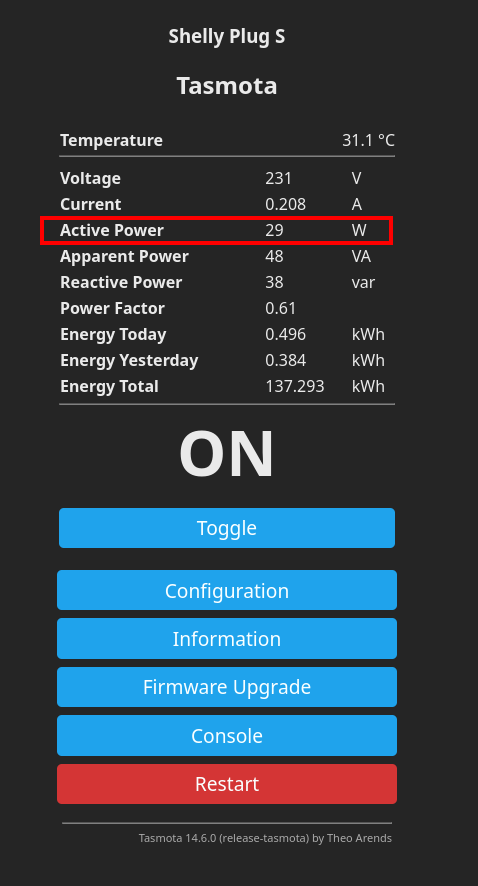
To verify the effect of these changes, I used a Shelly Plug S to monitor the server’s power consumption. I flashed Tasmota on the plug using OTA, which is a open-source firmware for ESP devices.
This was useful to actually measure whats going on instead of only relying on powertop. I could see the real power draw of the entire system at the wall. This helped confirm whether BIOS changes, hardware removal, HDD spin-down, or service changes had an actual effect on power consumption.
(under load)
HDD spin-down and storage layout
The server uses both SSDs and HDDs. The SSD is used for the operating system, Docker containers, databases, and frequently accessed files. The HDDs are used for larger data that does not need constant access, such as media or bulk storage.
I configured software RAID using two HDDs. Since these disks are not needed all the time, I wanted them to spin down when they are idle in order to reduce power consumption and noise. However, they did not spin down automatically as expected, so I wrote a systemd service/script to handle HDD spin-down manually.
This introduced another issue: the HDDs kept spinning up unexpectedly. After debugging, I found that some Docker-related files and services were still stored on the HDDs.
To investigate this, I used blktrace to check which processes were accessing the disks. This helped identify which services were touching the HDDs. After finding the cause, I moved the Docker container files and other frequently accessed data to the SSD.
This separation made the storage layout much more sensible:
- SSD: operating system, Docker files, databases, and frequently accessed service data
- HDDs: bulk storage, media, backups, and less frequently accessed files
After this change, the HDDs could stay spun down for longer periods when not in use, while the active services continued running from the SSD without constantly waking the disks.
Chosen OS
The server runs Debian Linux in a headless setup, without a desktop environment.
Debian was chosen as the base system because its stable. Since the server is managed only remotely through SSH, there was no need for a gui. Removing the desktop environment also keeps the system lighter and reduces unnecessary resource usage.
Why Docker
All services on the server run inside Docker containers and are managed using Docker Compose.
I considered using virtual machines or a Proxmox-based setup, but the server is built from an old desktop PC and, running multiple full virtual machines would not be possible.
I also looked into LXC containers, but Docker Compose felt like the easiest and most practical solution.
Services
The server currently runs multiple self-hosted services, all managed through Docker Compose. Each service has its own container configuration.
The currently running services are:
| Service | Purpose |
|---|---|
| Baikal | CalDAV/CardDAV server for calendars and contacts. |
| Glances | System monitoring. |
| Home Assistant | Smart home automation. |
| Homebox | Home inventory and asset tracking. |
| Homer | Dashboard for accessing the server services. |
| Jellyfin | Media server for films, series, and other media. |
| Kanboard | Project and task management. |
| Mealie | Recipe management and meal planning. |
| qBittorrent-nox | Web-based torrent client. |
| Syncthing | File synchronization between devices. |
| WireGuard | VPN access to the home network. |
| urban_plant | Custom Docker container for the plant monitoring project. |
Closing thoughts
This server started as an old gaming PC that was just sitting unused, and slowly turned into something I actually use daily.
The services themselves were not the hardest part. Most of that was done by reading the documentation, copying/modifying the Docker Compose files, and fixing the small config problems.
The more interesting part was making the hardware behave in the most efficient way by removing unnecessary parts, debugging the C-states, measuring the power consumption, dealing with HDD spin-down.
This is a very minimal server setup, most services are accessed through local IP addresses, and I do not expose them directly to the internet. The remote access is handled through WireGuard, which is enough for me.